

We don’t mess around here when it comes to over-the-top desserts. When faced with the curious problem of too much leftover trick-or-treat candy, I don’t just rip open a brownie mix and throw in handfuls of Twizzlers and Smarties. There has to be a method to the madness.
My method came about after our town’s untimely October 25 trick-or-treat night. We’d purchased an extra-large bag of candy, because we now live in a neighborhood that’s quite popular for commuting trick-or-treaters. Come the big night, though, we were all having so much fun meandering around from house to house with our friends and their kids that, by the time we got back home, the streets were empty; we didn’t hand out one piece of our trick-or-treat candy. “Give it to people who don’t have enough food!” Frances suggested. The concept of donating candy to a food pantry makes sense to a 4-year-old, but to me there’s something amiss with it to me, like dropping off moldy Reader's Digest Condensed Classics at a charity booksale.

So much effing candy.
For a few nights I nibbled an assortment after Frances went to bed: a Snickers bar, then a Twix, then a little pack of M & M’s. I should have been satisfied, but my hands kept creeping back to the candy bowl.
As an adult, I find most candy too sweet and one-dimensional. Halloween candy does not hit the spot like it used to. Really, why do I bother eating it at all?
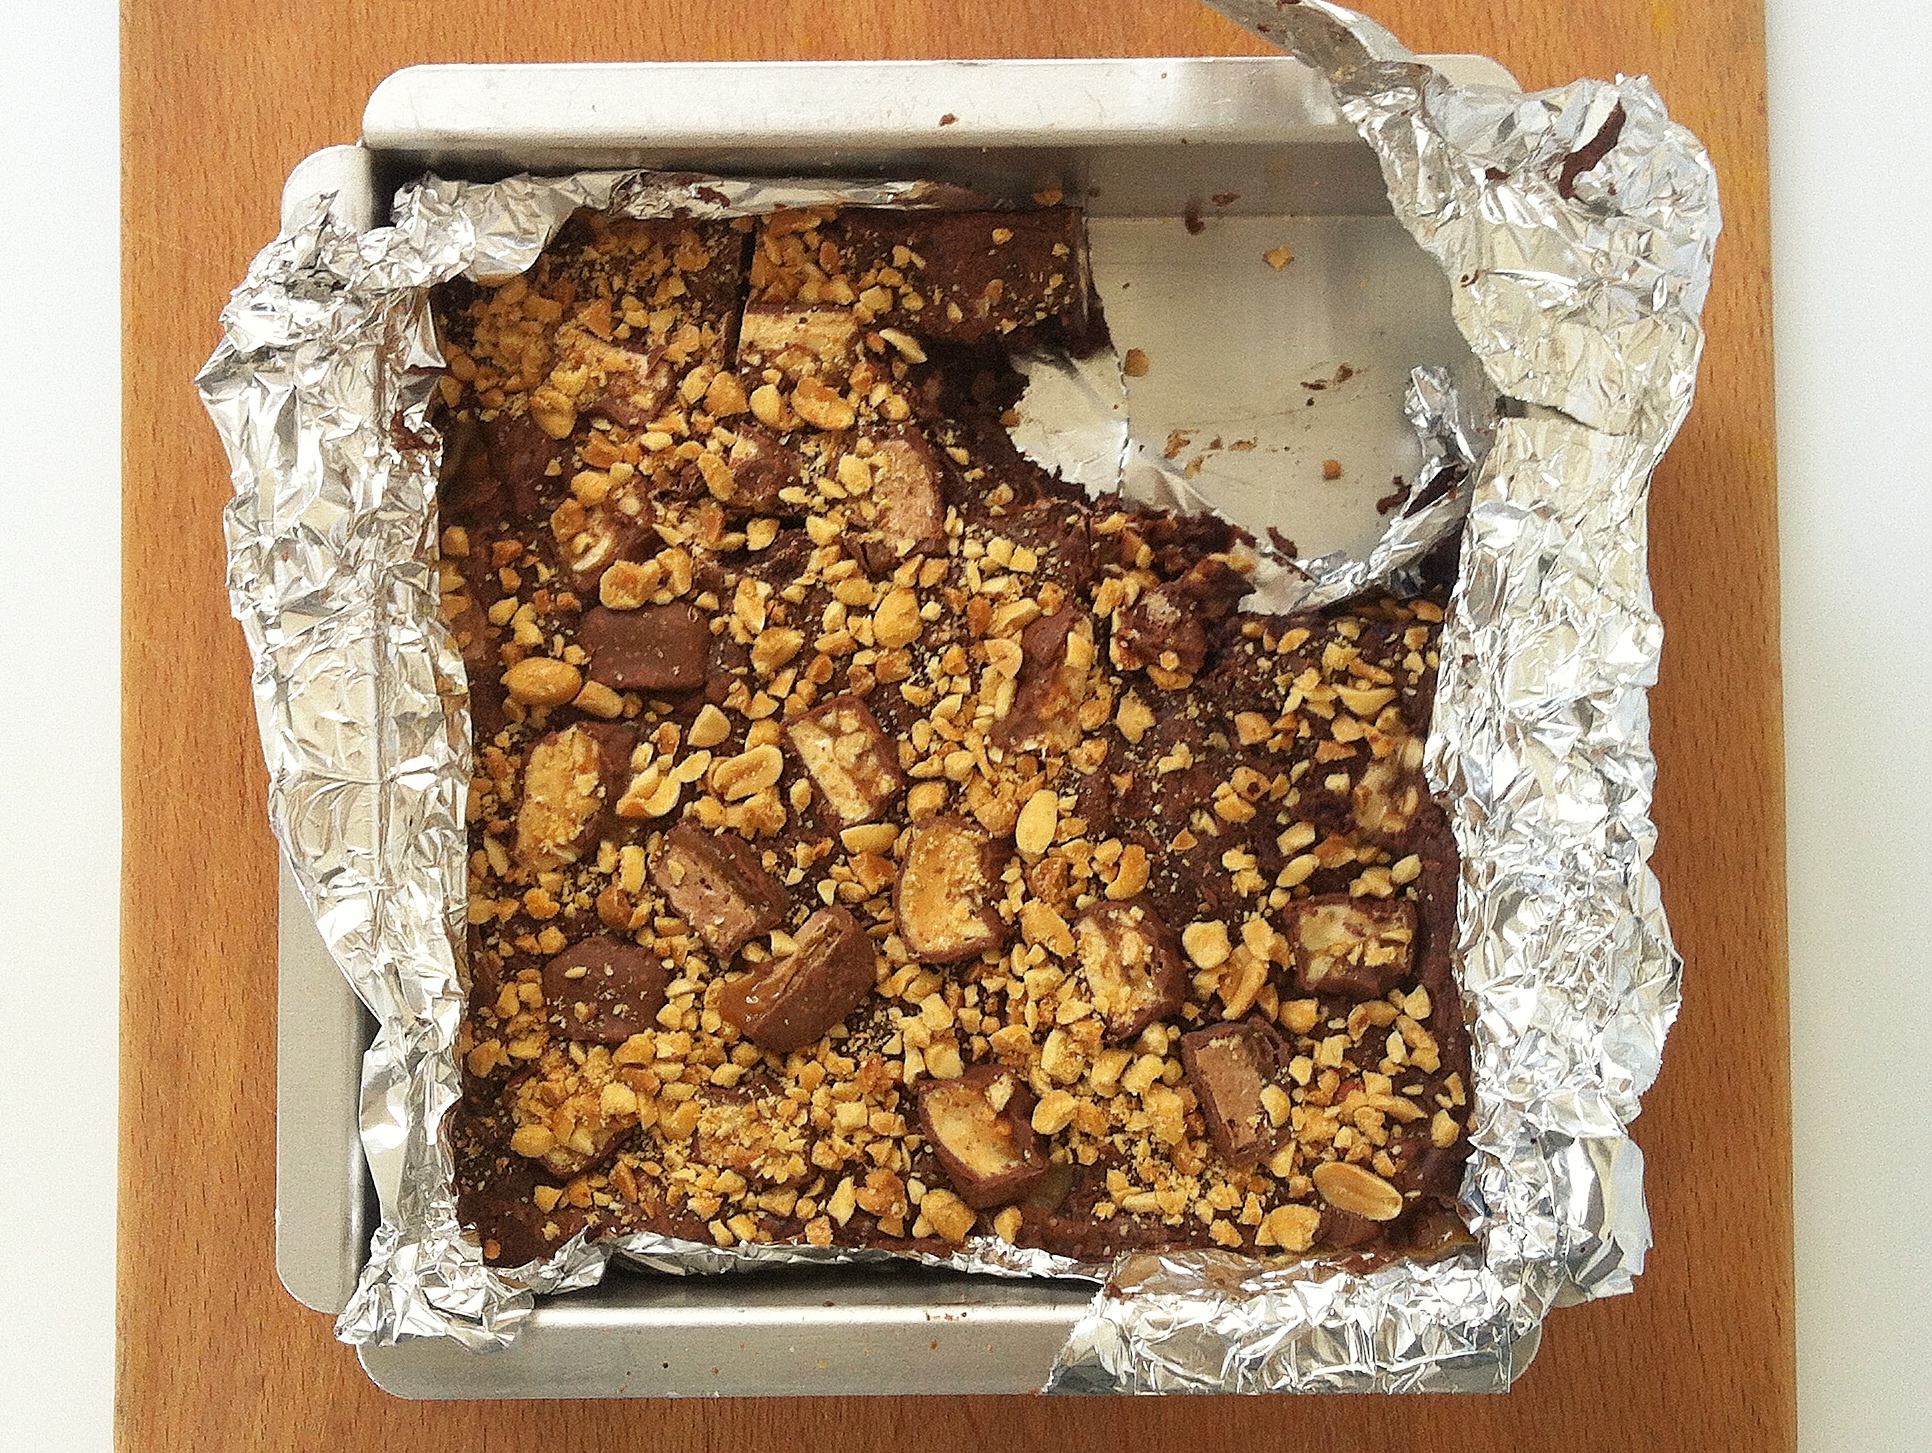
My husband started nibbling at the corner before these got a chance to cool. I like them better the next day, after they've set.
There’s another reason I should keep my distance from those little sugar-bombs in their shiny wrappers. I wrestled with an eating disorder for many years, and junk-food sweets were always my undoing. That’s why I never have that kind of stuff around the house. Just seeing a bowl of candy makes me feel compromised, distracted, and weak. It’s difficult to write about not because I’m ashamed, but because it’s challenging to articulate to anyone who hasn’t gone through something similar. People wouldn’t leave festive crack pipes and dime bags out in front of recovering drug addicts, but those of us who came out of disordered eating to have healthy, balanced relationships with food have to deal with this bullshit every year. It begins with Halloween and tapers off after New Year’s, when everyone freaks out about their holiday indulgences.
So this year, I decided to be the candy’s boss and make it into something worth eating—something so worth eating one or two amazing bites would do it. Taking a cue from Maida Heatter’s brownies layered with baked-in peppermint patties, I dug out my favorite brownie recipe, some fantastic raw ingredients, and a sharp and pointy knife. I unwrapped twenty Fun Size candy bars and chopped those fuckers up. I dropped them onto the brownie batter, shoved them into a hot oven, and told them to go to hell. Once they cooled, I cut them into tiny squares and ate one. A few hours later, I ate a second one. And then I was done, because I’d taken something shitty and made it into something awesome.

These witch and pumpkin picks are so cool. My mom saved them from the 1970s.
Totally Grown-Up Halloween Candy Brownies
Makes 36 small brownies
This is essentially candy bars bound with brownie batter, a baked confection. The batter itself is intense and bittersweet, something to offset the cloying candy. Cut them into tiny squares, like truffles.
- 3 ounces unsweetened chocolate, finely chopped
- ½ cup unsalted butter
- 1 cup granulated sugar
- ¼ teaspoon salt
- 2 large eggs, straight from the refrigerator
- ½ teaspoon vanilla extract, optional
- ½ cup unbleached all-purpose flour
- 12 ounces Snickers and Milky Way bars, sliced crosswise into sections about ½-inch thick (this is 20 Fun Size bars)
- ½ cup chopped roasted peanuts (salted ones are nice, but unsalted will work, too)
Preheat the oven to 325 degrees F.
Melt the butter in a medium high-sided skillet over medium heat, keeping an eye on the pan so the butter does not burn. When the butter is quite hot (you may hear it sizzling or popping a bit), remove the pan from the heat and add the chopped chocolate. Stir once with a wooden spoon or rubber spatula and set aside to finish melting while you prepare the pan.
Line an 8 x 8-inch pan with foil or parchment paper, letting several inches hang over two opposite sides to create handles. Grease the pan and foil and set aside.
Now stir the chocolate and butter mixture until is smooth and the chocolate is completely melted. Beat in the sugar and salt, then beat in the eggs, one at a time. Add the vanilla, if using. Beat in the flour until the batter is smooth and shiny and a little tacky.
Spread half of the batter in the prepared pan. Lay the ¾ of the candy bar pieces on top of the batter in a mosaic fashion. Drop the remaining batter on top and smooth as best you can (it does not have to look perfect). Lay the remaining candy bars pieces on top, and then scatter the chopped peanuts over them.
Bake until a toothpick inserted in the middle of the pan comes out with moist crumbs, not raw batter (about 30 minutes, but this can be hard to gauge, since the caramel and melted chocolate will be gooey). Cool on a rack or place in the freezer until the brownies are cool and set. Using the parchment or foil handles, life the brownies out of the pan. Invert on a cutting board and peel off the foil or parchment. Place another cutting board on top and invert again, so that the brownies are nutty-side-up. Cut into squares (I prefer smaller ones, a little over an inch across) and serve. To me, these taste best the day after they were baked; when still hot from the oven, they’re impossible to cut nicely, and they’re so gooey all of the flavors run together.


